


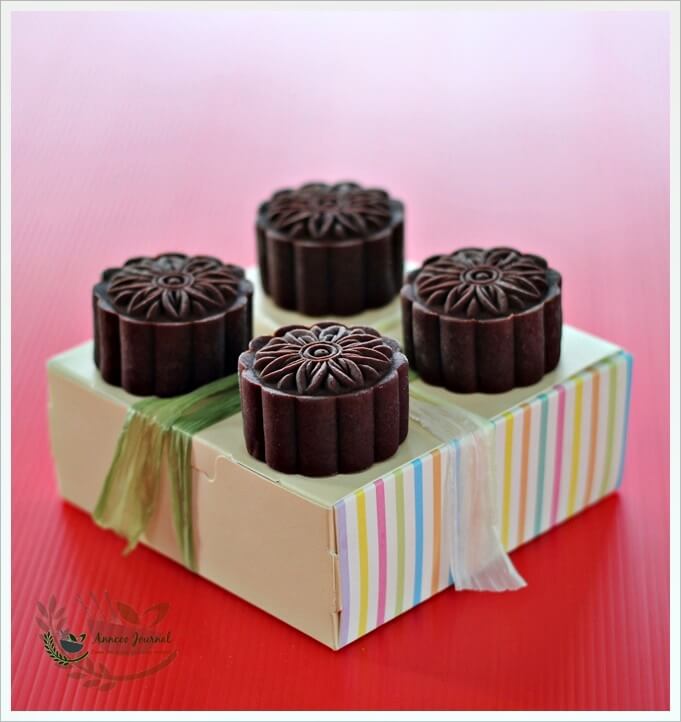
Baked Chocolate Mooncakes seem to be an emerging new trend of mooncakes for the forthcoming Mid Autumn Lantern Festival. After seeing so many Chinese bloggers making this mooncake with plain flour, I too jumped on the bandwagon and immediately wanted to join the craze. So here are my dark beauty mooncakes. My mooncakes look like a piece of dark chocolate, probably due to the fact that I used valrhona cocoa powder for the skin and coffee lotus paste for the filling. However, the dough skin is very manageable and not much extra flour is needed in handling the dough. These mooncakes with a crispy crust skin can be eaten immediately. If you would prefer a softer texture, you’ll need to be patient and wait for another 3 days for the mooncake skin to soften (回油) before serving. Definitely another keeper recipe for Mooncake Festival.

Baked Chocolate Mooncakes

Prep time
Cook time
Total time
Author: Ann Low
Serves: 12 pieces
Ingredients
- 113g Plain flour
- 18g Cocoa powder (I used valrhona cocoa powder)
- 85g Sugar syrup
- 40g Peanut oil
- ½tsp Alkaline water
360g Coffee lotus paste (store bought) with one handful of melon seeds, divide into 12 portions, 30 each
Instructions
- Mix sugar syrup, peanut oil and alkaline water together thoroughly.
- Sift plain flour and cocoa powder in a bowl. Make a well in the center and pour sugar syrup mixture. Using a rubber spatula to mix and form to a soft dough. Cover with a cling wrap and let it rest for 15 minutes.
- Divide dough into 12 portions, 20g each and roll into balls. Wrap the dough around the coffee lotus paste.
- Roll it into ball and dust with some flour. Press firmly into mould, unmould and place on a lined baking tray.
- Bake at preheated oven 170C for 10 minutes. Remove from oven and rest mooncakes to cool for about 15 minutes. Then bake the chocolate mooncakes again for another 10-15 minutes.
- Leave mooncakes to cool down completely before storing into an airtight container. This mooncake can be eaten immediately after baked or wait for about 3 days for the mooncake skin to soften (回油) before consuming.
3.5.3251
烤巧克力皮月饼
Prep time
Cook time
Total time
Author: Ann Low
Serves: 45 mins
Ingredients
- 113克 普通面粉
- 18克 无糖巧克力粉 (我用valrhona可可粉)
- 85克 糖浆
- 40克 花生油
- ½茶匙 碱水
360克 咖啡豆莲蓉(买现成的)和一把瓜子,分成12份,30克一份,搓圆
Instructions
- 把糖浆,碱水和花生油混合均匀。
- 将面粉和巧克力粉过筛在大碗里,中间挖个洞倒入混合好的糖浆,用橡皮刮刀拌成软面团,盖上保鲜纸放置一旁休息15分钟。
- 然后将面团分成12份,每份20克,搓圆。包入咖啡豆莲蓉。
- 搓圆,粘上少许粉。压入月饼模里,扣出排在烤盘上(底部铺纸)。
- 放入预热烤箱170度C,烤约10分钟,取出去待冷15分钟,再放入烤箱,烤10-15分钟即可。
- 待月饼完全凉后,装进盒子里。等月饼回油后(越3天),就可以切块享用了。
Notes
正如Cass所说的,这巧克力皮月饼,可以烤好后马上吃,也可以等回油后(2-3天)再次,让你体会到两种不同的风味。
3.5.3251


*************
This post is linked to the event, Little Thumbs Up organised by Bake for Happy Kids and My Little Favourite DIY,
and hosted by Diana from the Domestic Goddess Wannabe.
and hosted by Diana from the Domestic Goddess Wannabe.

***********