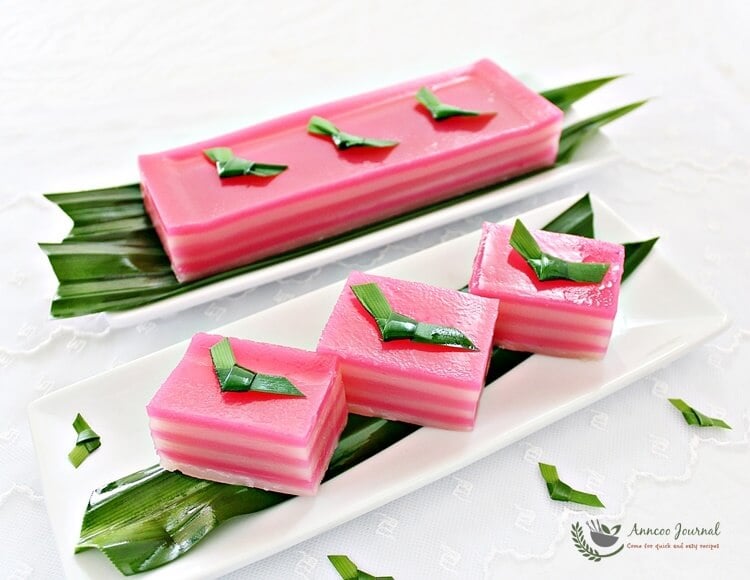
Kuih Lapis (Steamed Layer Cake)

Steamed Kuih Lapis (steamed layer cake) is a popular snack in Malaysia and Singapore and it literally means layer cake in Malay. When I was a little girl, I enjoyed eating this kuih by peeling the different coloured layer by layer. This Kuih Lapis recipe was adapted from a Chinese Coobook ~ Malaysian Delicacies. I was a little hesitant at first whether to try this recipe or not when I saw more tapioca flour rather than the rice flour is used. Since I only have a packet of tapioca flour and little rice flour on hand, I just went ahead to try this recipe. The Kuih Lapis turned out very fragrant and with acceptable texture as well. But I’ll definitely want to try the rice flour and mung bean flour mixture next time, so that I can compare the texture of this Kuih Lapis. Oh… due to my laziness and as I wanted to complete the process fast, you will notice a thick layer on two colours, Only 6 layers were made instead of 9 and the lapis will definitely looks taller and prettier if I were to use a smaller cake pan.

Kuih Lapis (Steamed Layer Cake)
Prep time
Cook time
Total time
Author: Ann Low
Ingredients
- 350g Tapioca flour
- 100g Rice flour
- 50g Sago flour
- 500ml Water
- 400g Sugar (used 280g)
- 4 Pandan leaves
- 500ml Thick coconut milk with a pinch of salt
- Rose pink colouring
Instructions
- In a pot boil water,sugar and pandan leaves together till sugar dissolved. Turn off heat, discard pandan leaves and add in coconut milk. Stir well and leave aside to cool.
- Mix tapioca flour and rice flour together and gradually blend well into coconut liquid with a hand whisk. Then strain mixture through a sieve to ensure it is free from lumps.
- Divide mixture in two equal portions and add desire colouring into one portion, keeping one portion white. (You can use more colours if you prefer to have more colourful layers)
- Grease a 7 inch square or round cake pan and place in steaming pot for few minutes over high heat.
- Pour about 100-125ml of white liquid into the heated pan and steam at high heat for about 4 minutes or until batter is cooked. Then add 100-125ml of pink liquid onto it and steam for another 4 minutes. (reduce liquid for thinner layers)
- Repeat the procedure, alternating white and pink liquid until all the batter is used up. Remember to stir the batter every time before pouring out the liquid to steam each time.
- Add a little more rose pink colour to the last layer to make it a deeper shade of pink, and steam the whole cake for about 15 mins.
- Leave Kuih Lapis to cool completely after steamed and invert the cake pan to knock out the kuih.
- Grease knife with little oil before cutting. You may also brush a little oil on the surface as gloss finishing.
Enjoy and have a wonderful weekend!
Hi, any alternatives for the pandan leaves and sago flour? I live in the US and did not find them here but I really want to make this as I love it. Thanks
Hi Juju, you can omit the sago flour and increase the tapioca flour to 400g. You can add about a teaspoon of pandan essence instead of pandan leaves.
Hello Ann , Can I use tapioca starched instead of tapioca flour?
Hi Linda, Tapioca four and Tapioca starch are the same.
Did you try making kuih lapis with the rice flour and hoen kwee flour mix as you mentioned? Also I was given a recipe that had more rice flour than tapioca flour. But in your recipe and a few others I saw there is more tapioca flour than rice flour…. Can you tell me what would be the difference? I love springy kueh lapis that you can peel layer by layer….
Thanks
Hi Jenn, I only tried this recipe with more tapioca flour and yet to try with rice flour or hoen kwee flour. But I’m sure using different type of flours will give good texture if the proportion is right.
Hi Ann I saw in your recipe you mentioned 400g sugar (used 200g) how does that works? Are you suggesting only used 200g instead of 400g?
Hi Julie, I adapted this recipe from a cookbook and I only used 280g. 400g sugar is too sweet.
wish me luck Ann, will try this out after an almost failed attempt using Nona's Tepong Hoen Kwe :)~ baba ASP
One of my favorite kueh’s, made it today lovely but it is a bit sticky? Where did I go wrong ?
Hi Esther, You mean the kueh is sticky after steaming? Every layer must be fully cooked before after the other.
Made this during the weekend, turn out excellentMy family loves it… My nieces keep bugging me to make it again
Hi Samantha, I'm happy to hear that :))Hope you have a wonderful week ahead!
Hi Ann,
I have steamed the Kuih lapis & it turned out very delicious. But why it is so sticky & stretchy & hence cannot be sliced. Please advise.
Regards
Florence
Hi Ann,
Thanks for your reply. I think I had steamed too Long. So it turned out sticky & starchy. Only the first layer at the bottom is sticky & starchy. The rest are good.
Hi Florence, Sorry to hear that but this is the first time heard that this kueh is sticky and stretchy. Hope you didn’t used the wrong flour. Every layer must be fully cooked before adding the next layer.
Anyway I’ll check it out with some of my friends who had tried this recipe and hopefully can tell what is the main problem.
Thanks for replying. I will try it out and see how the texture like.
You can use corn flour but not 350g.
Put it the other way round:
350g rice flour and 100g corn flour.
Hi Ann, if I want the layer cake to be slightly softer can I reduce the tapioca flour to 300g + 100g of rice flour?Lily Ko
Hi Lily, I'm not very sure about the texture after the adjustment of the flour. Why not try half portion first and see how is the result.
Lovely photos. Want to eat the kuih from the screen ;P
Rina H
The thought that came to mind is that, change the "pink" to "red" and it is so "National Day"! ;pI remember this as Gao Teng Kuih (in Hokkien) and I will eat them layer by layer too.
Hi Ann,
Can i use packet coconut cream like 'kara'….don't have the fresh stuff here.
Yes, no problem no use 'Kara' coconut cream.
Hi, can I substitute the tapioca flour with corn flour ?
这也是九层糕对吗?很美丽也。赞
哈哈哈。。。一定是给那厚度搞糊涂了 :DD
I'm never a fan of these nonya treats, but pink is my fave colour & you've made them so irresistible, Ann!
Shirley, I love pink too!
Hi Ann, wah… your kuih lapis so pretty and yummylicious. Nice click and presentation.Have a nice day.
Thanks Amelia!
One more masterpiece…i wish either to have little bit of your talent or have you as my next door neighbor! This really looks amazing Ann!
Thank you Sandra. How wish I'm your neighbor too so that I can try your delicious creations 🙂
Nice steamed layer cake, I has been thinking of making this kuih but never get my hand on it yet. I was like you, I like to eat it by peeling layer by layer.
I think better use the rice flour to make this kuih. The texture should be better than this one.
你的作品总是那么完美,你太棒了:)
你过奖啦!好看不一定好吃。。。 呵呵
Wonderful even layers and such a pretty colour, I would so love to try a slice of this cake with my morning coffee now!
sure, Tanja 🙂
i have never tried the recipe with more tapioca flour…interesting experiment …. I want to eat to try how' s the texture like. Beautiful colour 六层糕。
Li Shuan, yes when I googled I found this recipe usually used rice flour instead. Anyway tapioca flour still works well with the layers more chewy 🙂
Hi Ann! When I was a boy, I enjoyed peeling and eating this kuey layer by layer too… Now, I just put the whole piece in the mouth.. 🙂
hahaa… I still love to peel the layers…
I want to make these too! So pretty! BTW, why you cancel out the Sago flour? Because you do not have that in your pantry?
Yes, I don't sago flour in my pantry at that time.
So beautiful steamed kuih. I wish I can done like yours.
Hi Mel, I think you can do a better job than me 🙂
What a perfect kuih lapis, Ann! Love the sweet pink colour, yoh, pink is always my favourite colour, haha! And did you notice that in your 1st photo, the 2 folded layers of kuih lapis has formed a heart shape?
Jessie, I don't think this is a perfect kuih. The layers are too thick… hahaa
Wahh… you really looked everything into details. If I realized earlier, I'll post it on Valentine's day.
Awww.. looks so lovely 🙂 Looks like a lovely Valentine's day gift 🙂
Thanks! I should post this in February for Valentine's day 😀
Hehee.. You're so artistic, Ann. Wonderful photos, pretty bakes, and clear instructions, love your blog! 赞!*thumbs up* 🙂
Hehee.. You're so artistic, Ann. Wonderful photos, pretty bakes, and clear instructions, love your blog! 赞!*thumbs up* 🙂
Hi Ann~~
Nice~~~ ^^ i love this kuih~~
Huh…got both flours here…maybe I should give this a try! Though they won't turn out so pretty.
So nicely done. Love those even layers and colour.
yummy and lovely 🙂
Ann,This is a old time favorite!My grandma use to make this for sell when I was little. Her customer loves her '九层糕'very much.She is very tall so her customers give her a nick named 'panjang嫂'. So her customer always said Panjang嫂的九层糕,薄又好吃:pYours looks great. I loves to pull the layer apart and eat piece by piece..:p My panjang grandma 's recipe is more rice flour but yours is more tapioca flour. I bet it is QQ and yum yum!I must try your too.Thanks for sharing!mui
Hi Mui Mui,hahaa… Panjang嫂的九层糕 sounds so familiar.. Oh, I ever heard this name from a TV drama.Did your grandma passed her recipe to you? So can share with me :))
I love how delicate this looks – and the layers are beautiful!
This brings back some childhood memories. My godmother always bought me these little treats when I was little. They were usually in green and white layers. I really have to learn how to make these. First, I need to see where I can get pandan leaves. Thank you so much for sharing. 🙂
Your pictures remind me of my childhood! I remember peeling off the rainbow layers one by one.
So pretty and so elastic! Irrsistible!
Looks so beautiful… i would never want to eat it…
Ann , your kuih are fantastic ! They look really pretty 😀 I bet they tastes delicious as well 😉
does the kuih lapis texture turned out chewier than normal? it looks stunning!
Ann, 这糕点做到很美很美,这颜色看了很舒服的感觉。。。
What a fabulous presentation! Can't keep my eyes off the kuih….
Ann, this brings back childhood memories! My grandaunts use to make this kueh using 9 colours. As a kid, I also liked to peel and eat it layer by layer.
Phong Hong, I also love the 9 layers colour but am a little lazy when making this myself.
This is one of my favourite local steamed kuihs! Somehow, I always find it yummier if it's rainbow coloured hehe. I also eat it layer by layer ;p
Hi Janine, Will definitely make the rainbow colour the next time.
做糕我的兴趣不大,虽然我家婆很想吃哈哈~我看还是你请我比较快(^O^)
没问题,希望你不会觉得难吃就好了。
very nice colour and looks good!
Beautiful color, and nice even layers…lovely!
It looks incredibly pretty!
how much color and flavor has this recipe….looks amazing!
You can add a little more colour if you want a deeper colour. As for the flavour are from the coconut milk and pandan leaves.
really pretty colour, I love pink 😀